Setup Guide
E-commerce Integration & Migration
JSON‑LD Express for SEO Schema
JSON‑LD Express for SEO Schema is built to generate necessary Structured Data for your store so that your store performs well on SERP. You just need to do the initial setup and the rest will be handled by the application. Follow the step-by-step guide below to set up your app. Feel free to reach out to us if you need help.
Activating the Application
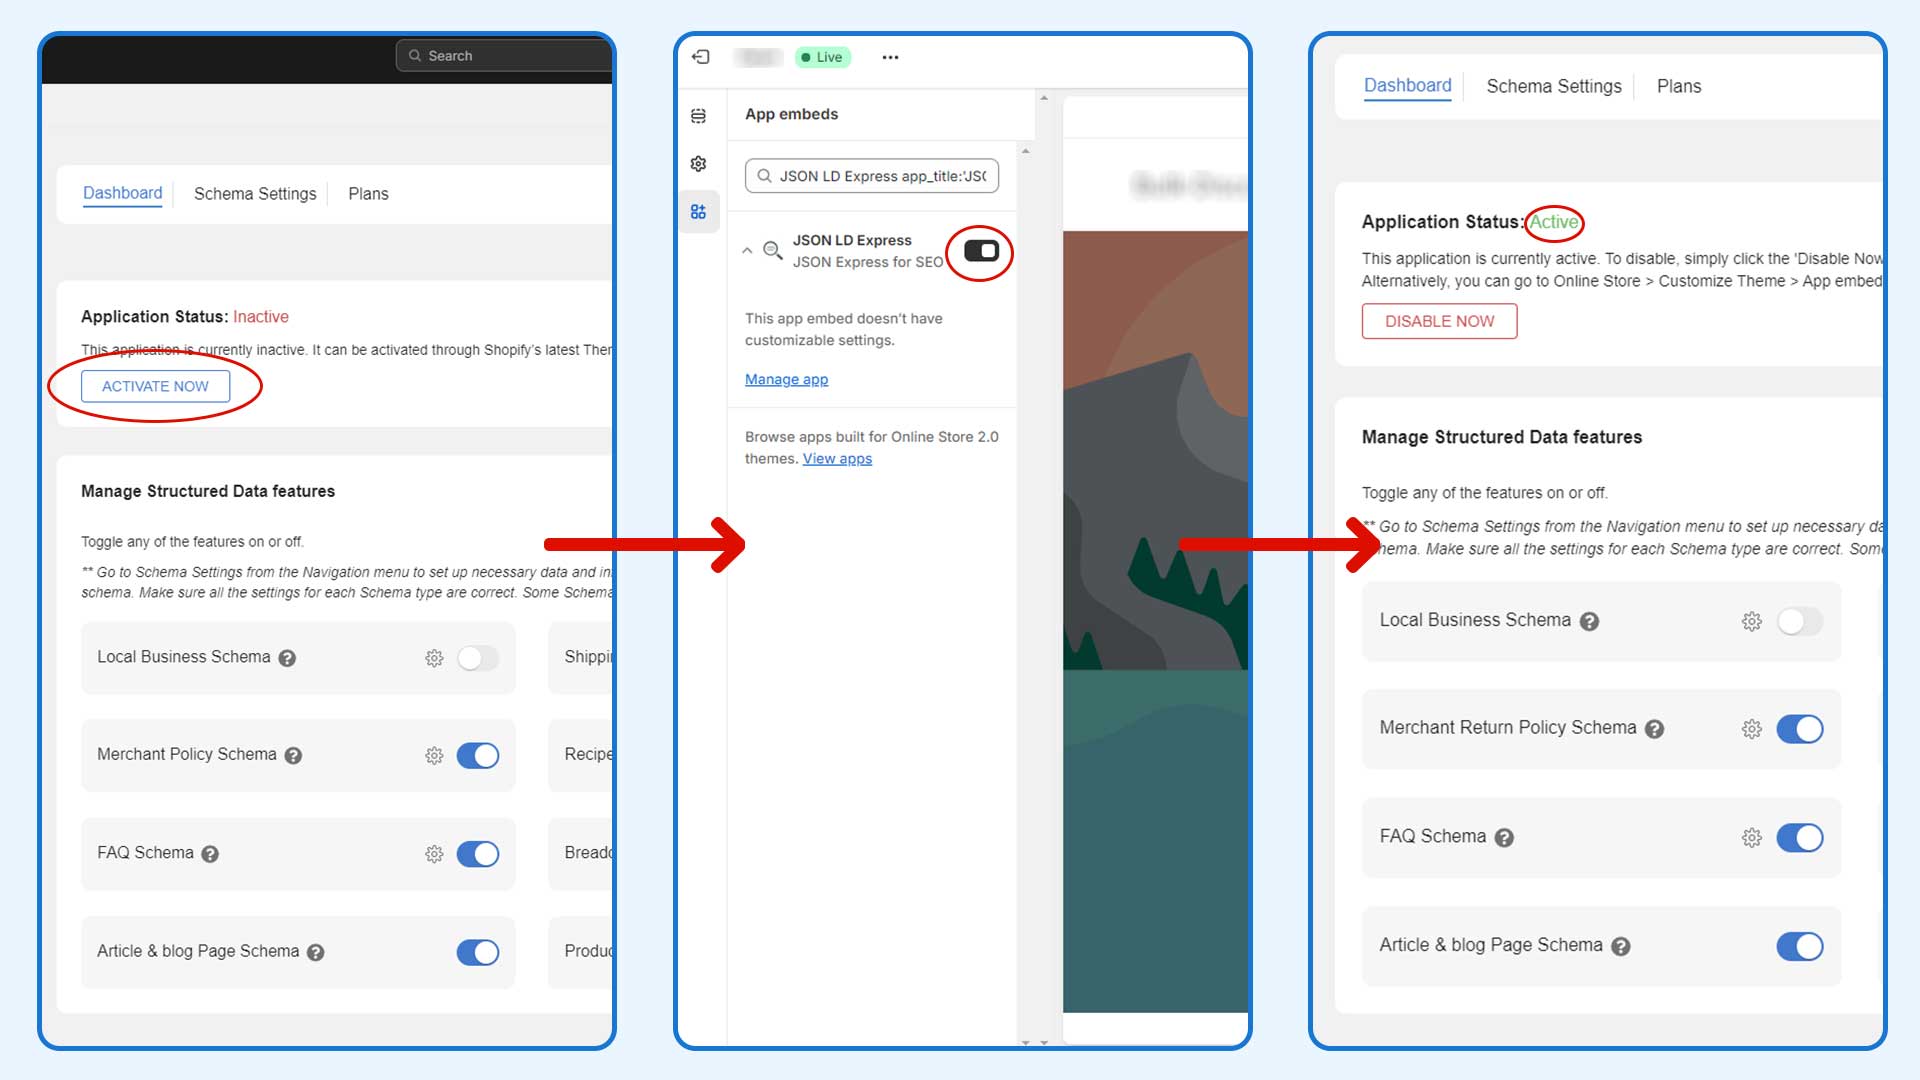
After installing the application, go to the Dashboard and under Application Status click on the ACTIVATE NOW button. This will take you to the App embeds page.
On the left make sure that the JSON LD Express toggle is on. Then click Save.
Go back to your App Dashboard and see if the Application Status is Active (in green). See the screenshot below.
Activating/Deactivating Individual Structured Data Features
You can activate or deactivate individual Structured Data features.
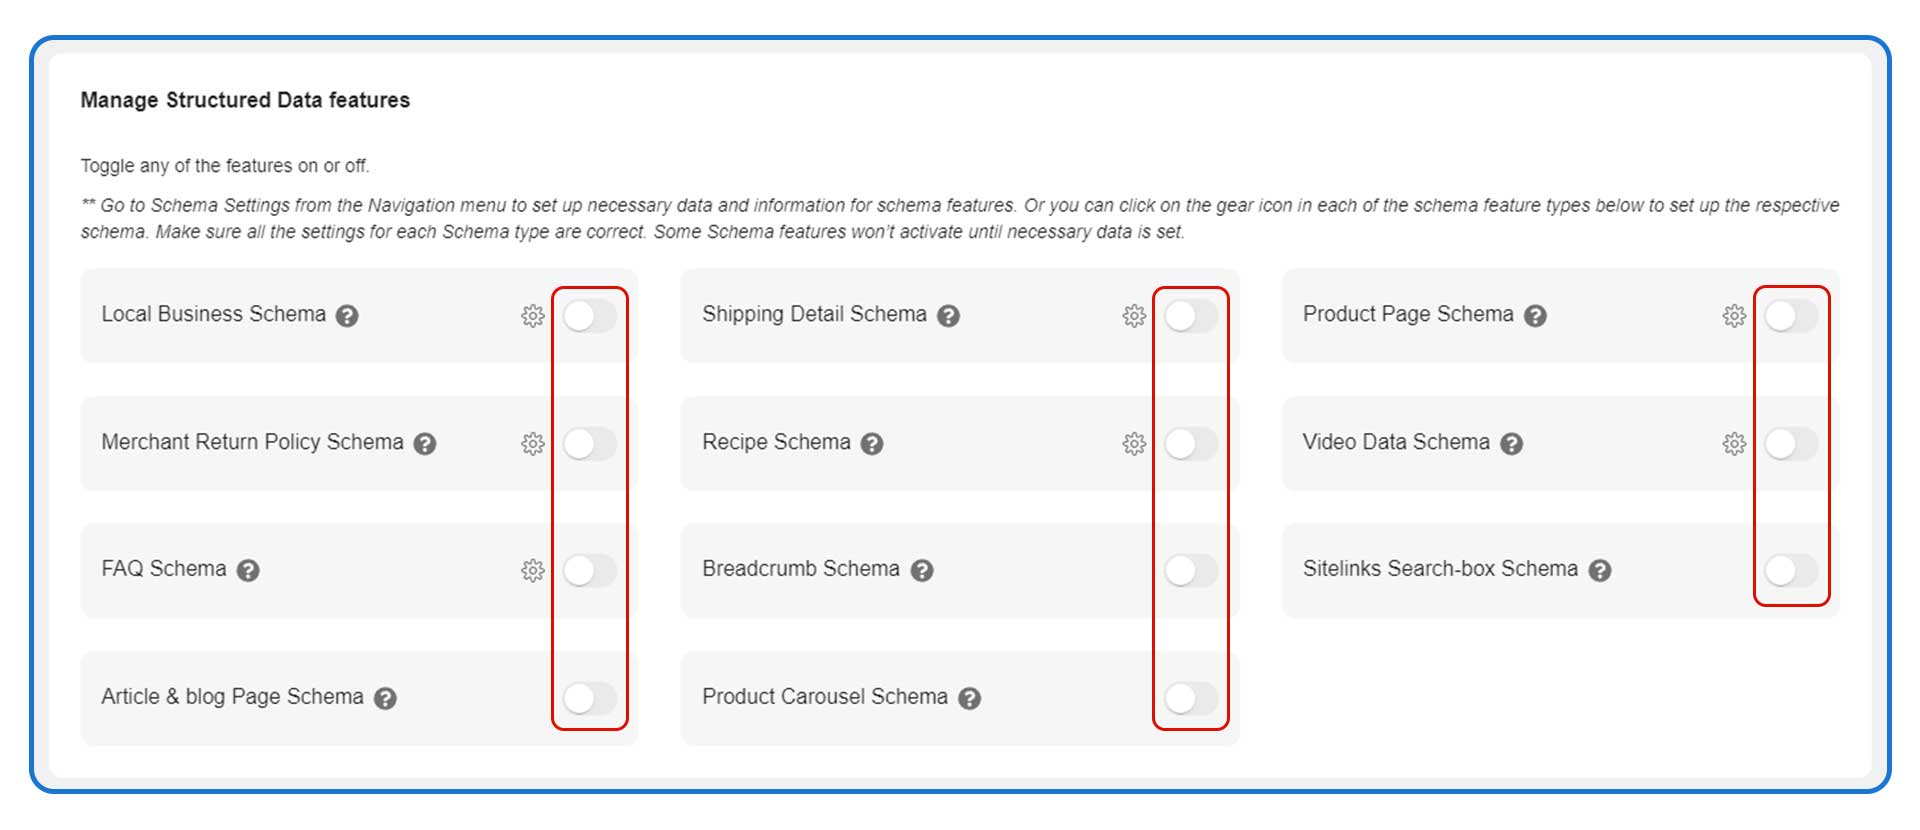
Right under the Application Status section on the app Dashboard you will see another section called Manage Structured Data features. All of the features are listed there. Each of them has a toggle icon with them. You can either activate or deactivate them individually as per your needs.
Some of these features have gear icons with them. Structured Data features that require some data to function have this icon with them. Clicking the gear icon will take you to the Schema Settings page and you’ll be able to add the necessary data easily.
You can just turn them on from the Dashboard. See the screenshot below.
Structured Data Features that don’t require any data input from you
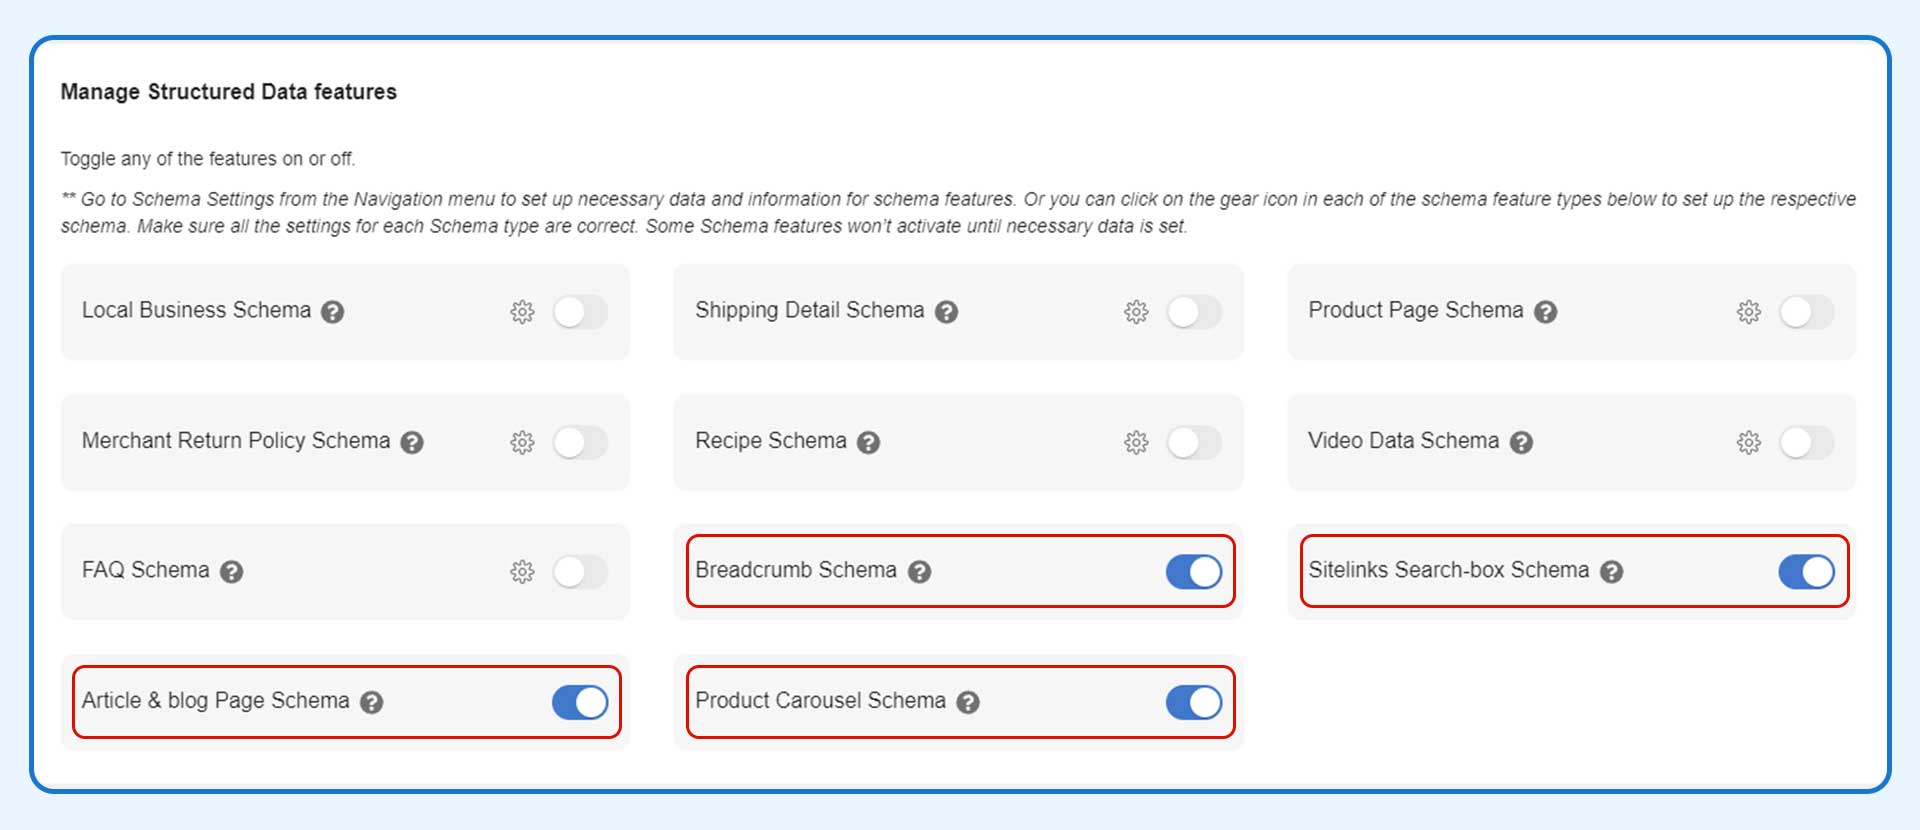
Some of the Structured Data features don’t require you to input any data manually. They are automatically pulled from your store and pages. They are:
- Article & blog Page Schema
- Breadcrumb Schema
- Product Carousel Schema
- Sitelinks Search-box Schema
See the screenshot below.
Activating Local Business Schema
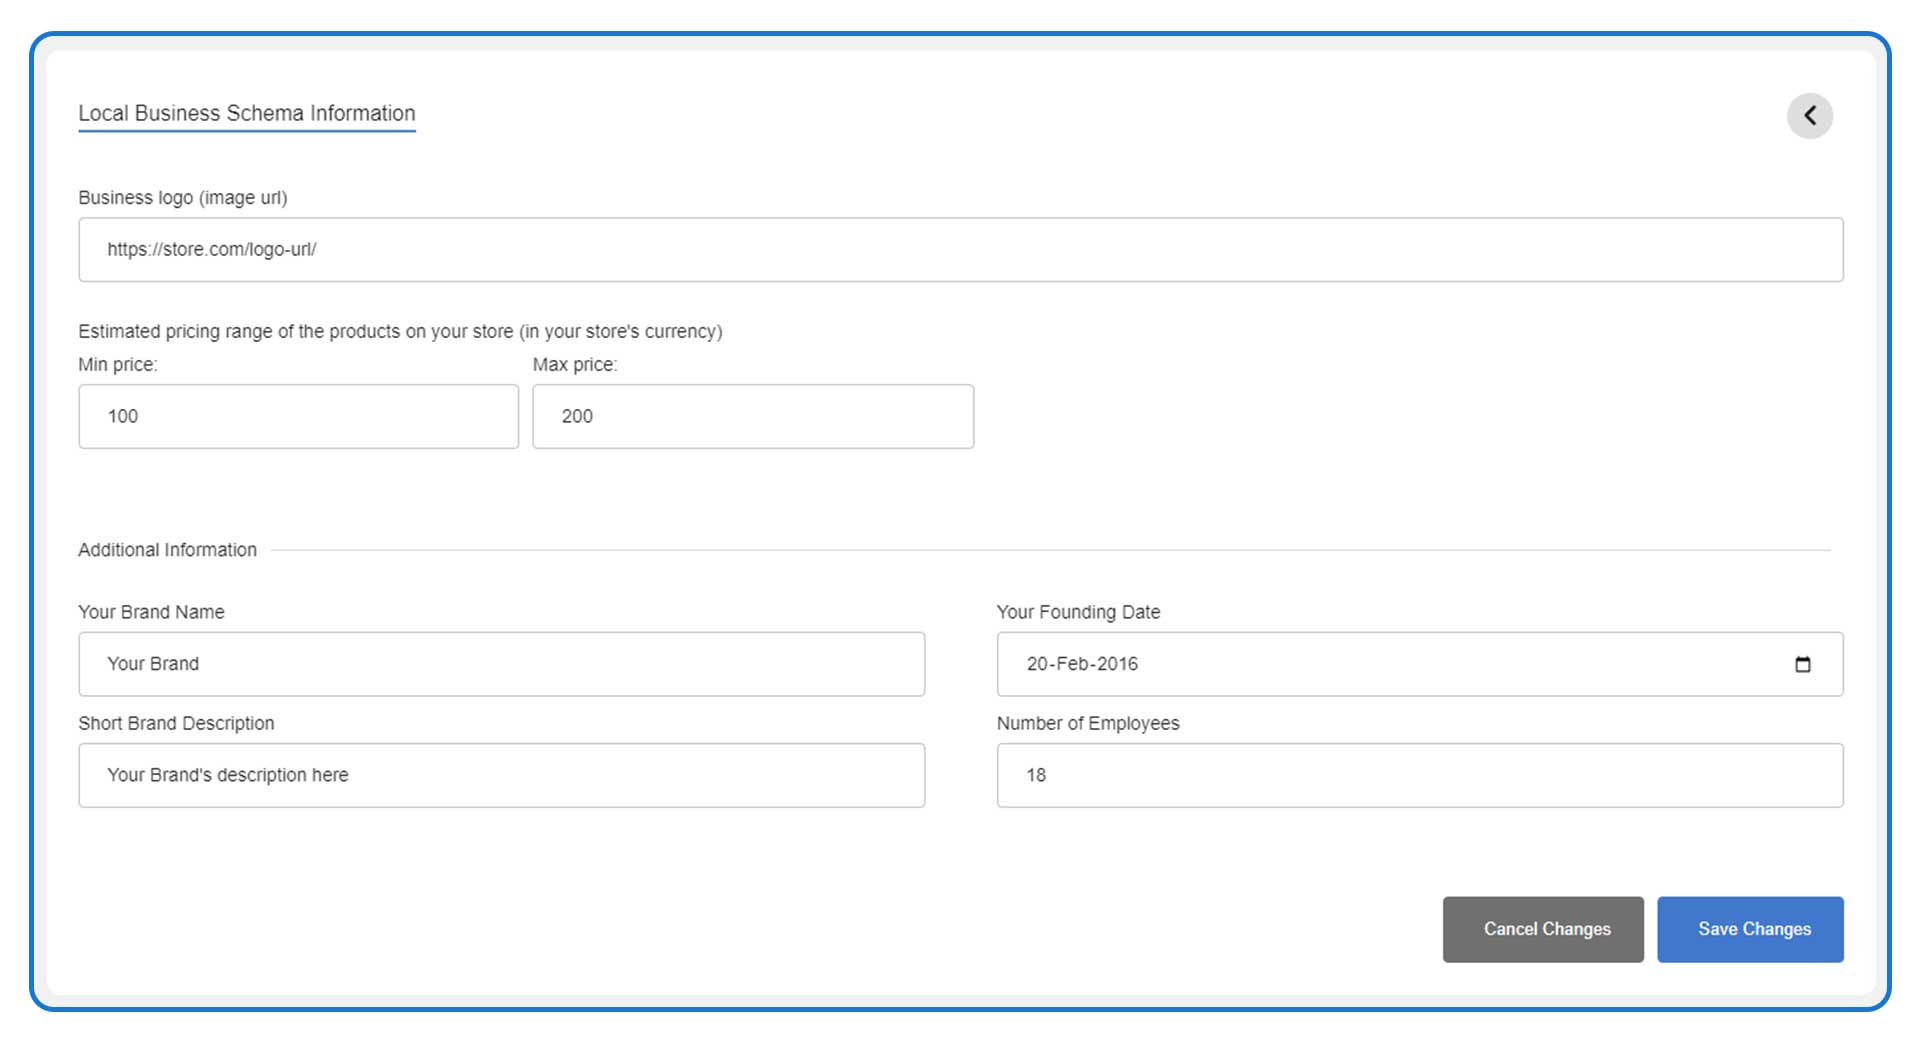
Click on the gear icon near Local Business Schema toggle icon or go to the Schema Settings page and find Local Business Schema Information from there. Then follow the steps below to fill out the information fields:
- Find the logo URL from your store. Paste it in the Business logo (image url) field.
- Type the minimum and maximum price of your products in the fields under Estimated pricing range of the products on your store.
- Under Additional Information, you can add more information about your business including your brand name, founding date of your business, a short description on your brand, and number of employees.
- Click on Save Changes.
- Then go back to the dashboard and activate the feature by using the toggle icon.
See the screenshot below.
Activating Shipping Details Schema feature
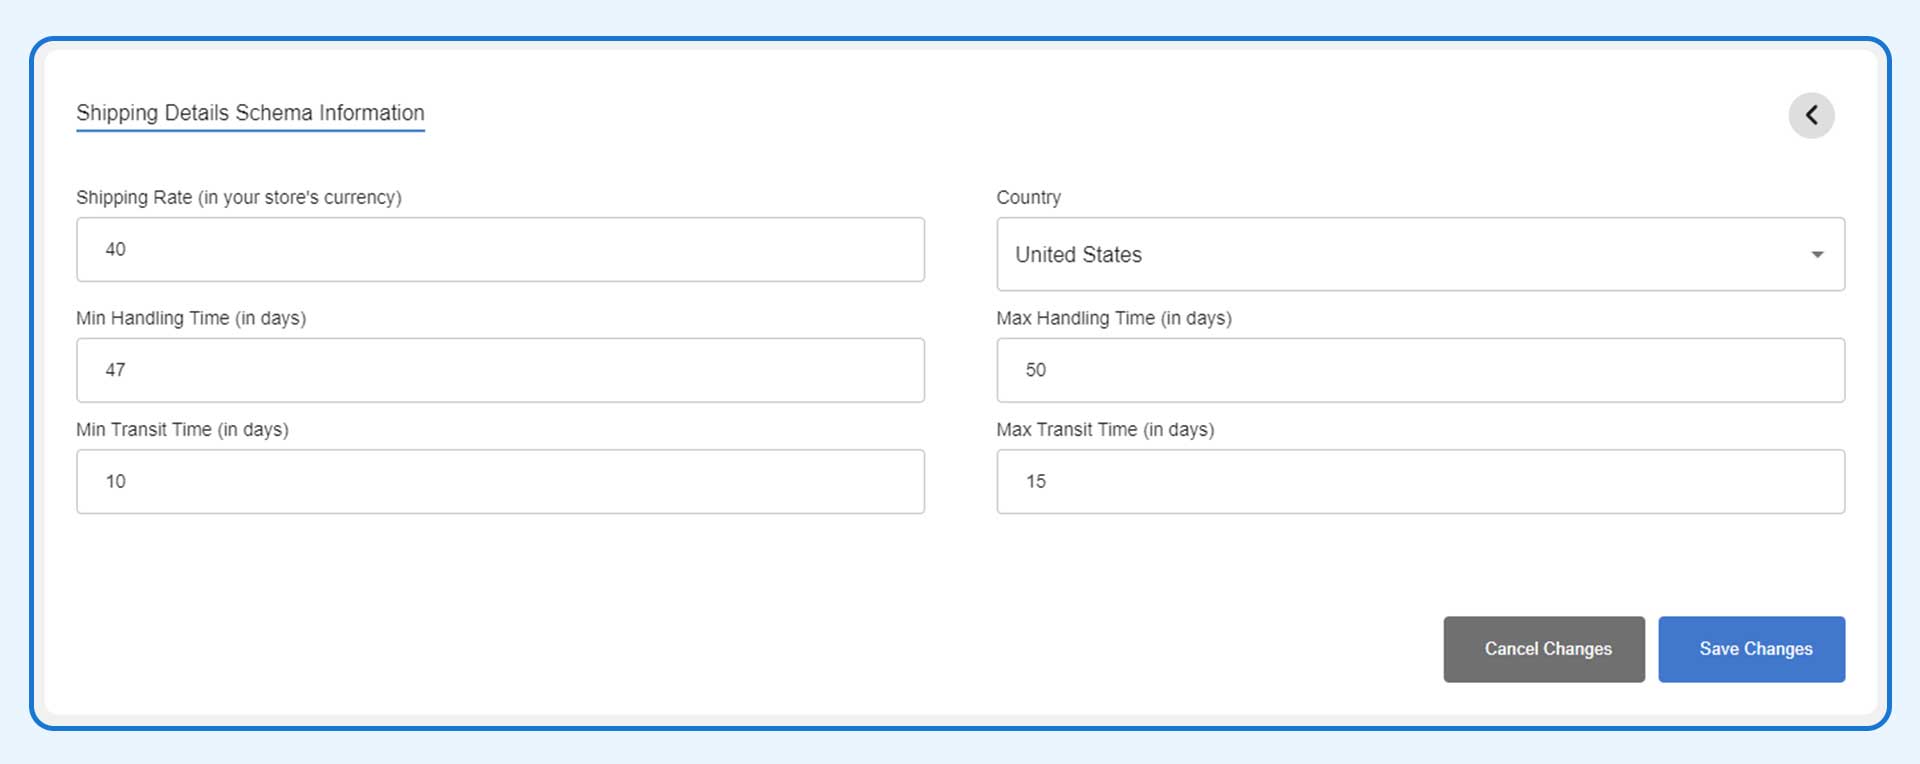
Click on the gear icon near Shipping Detail Schema toggle icon or go to the Schema Settings page and find Shipping Details Schema Information from there. Then fill out all the fields and click on Save Changes. Go back to the Dashboard and turn the toggle icon on to activate the feature.
See the screenshot below.
Activating Product Page Schema
You can click the toggle icon from the Dashboard and activate the feature. But if you are are getting the ‘Review has multiple aggregate ratings’ error after activating this feature, please follow the instruction below:
Click on the gear icon near Product Page Schema toggle icon or go to the Schema Settings page and find Product Page Schema Information from there. Check the Remove ratings and reviews structured data box and click on Save Changes.
See the screenshot below.

Activating Merchant Return Policy Schema feature
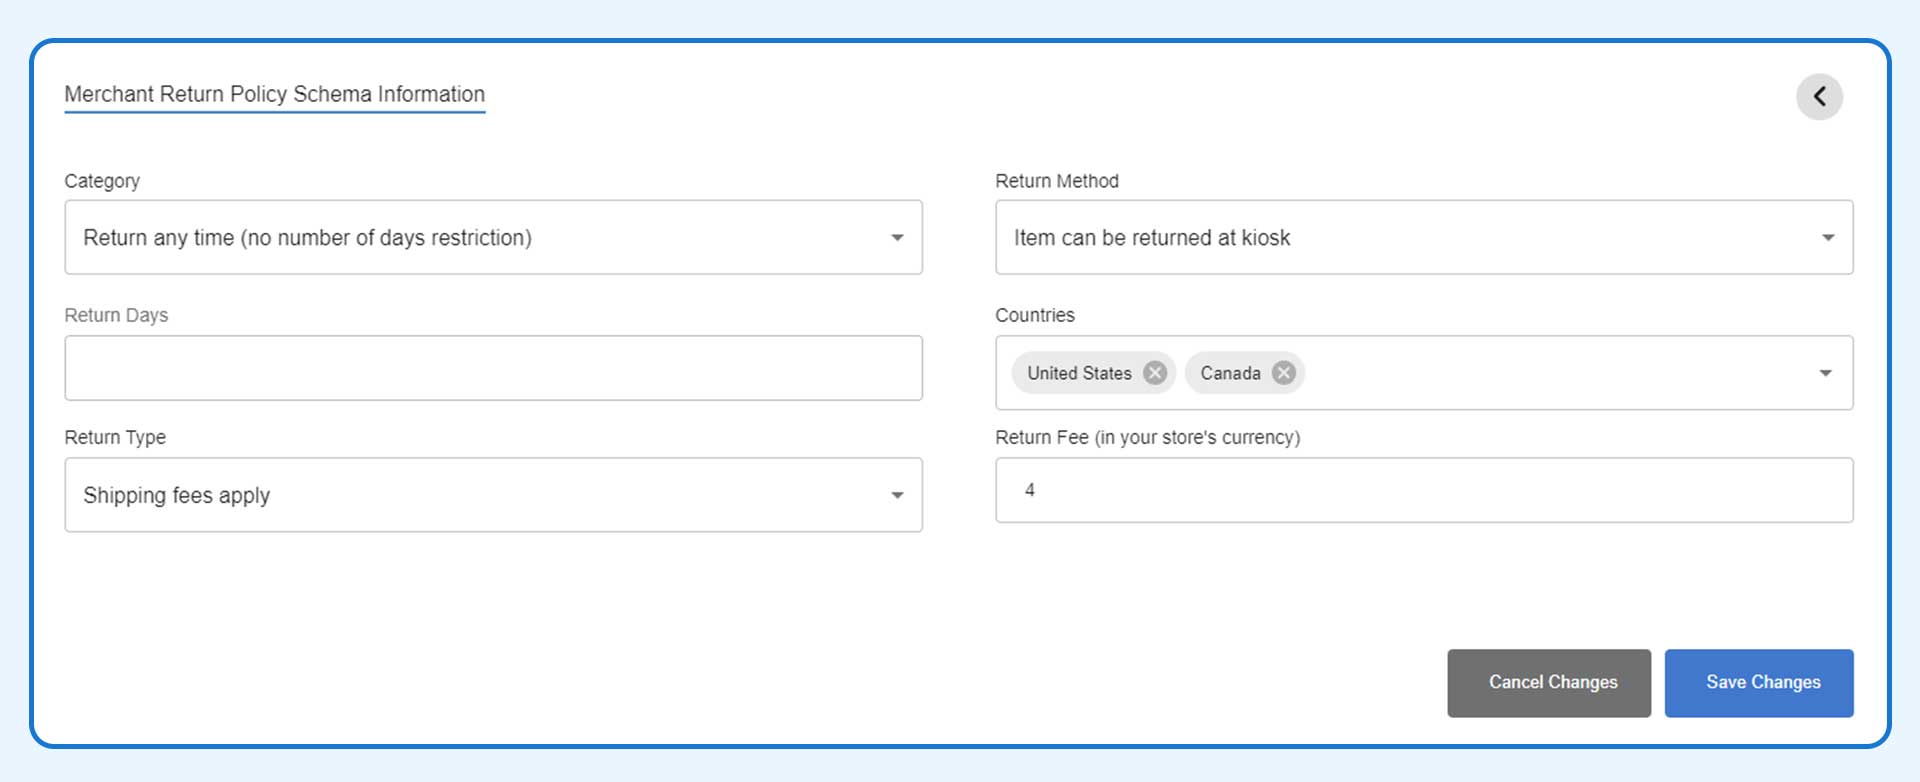
Click on the gear icon near Merchant Return Policy Schema toggle icon or go to the Schema Settings page and find Merchant Return Policy Schema Information from there. Then fill out all the fields and click on Save Changes. Go back to the Dashboard and turn the toggle icon on to activate the feature.
See the screenshot below.
Adding Recipe Schema
Recipe data has to be generated and put manually. For each recipe, you have to create unique structured data and add them to the respective recipe pages.
Recipe structured data can be added to two different types of pages.
- Blog Post
- Product Page
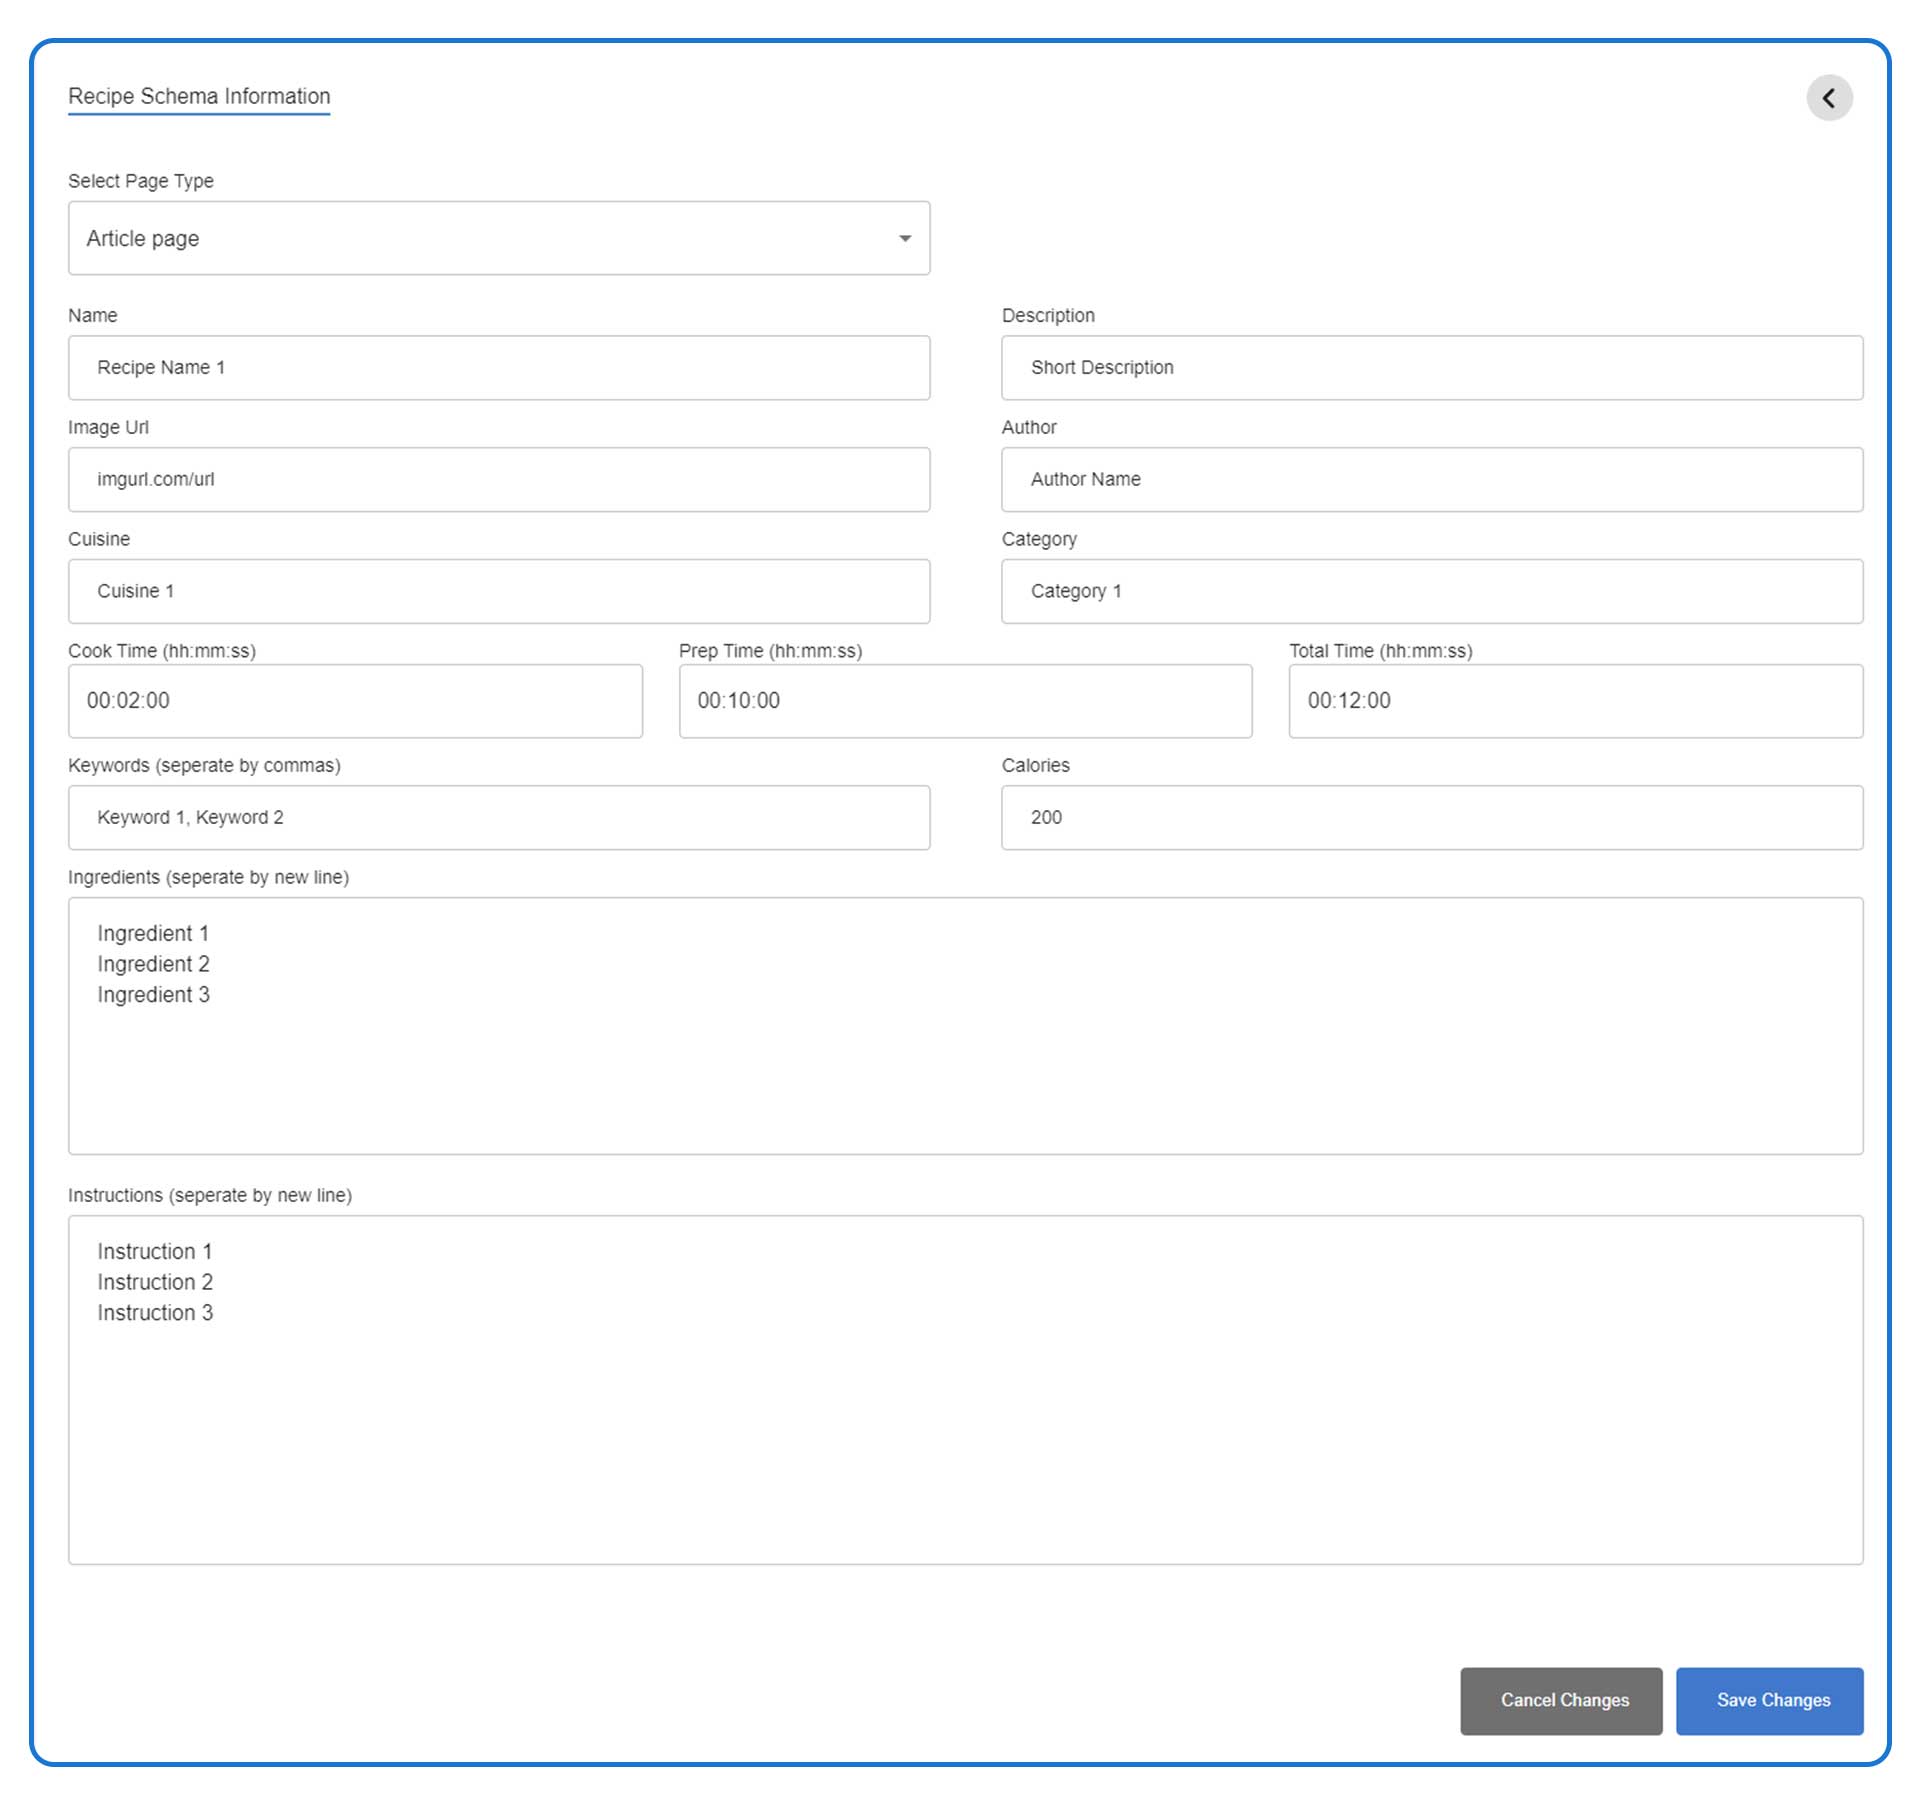
Click on the gear icon near Recipe Schema toggle icon or go to the Schema Settings page and find Recipe Schema Information from there.
Now choose the type of page that has the recipe you are generating the structured data for. Fill out all the fields. In the Image URL field, find the image URL that’s inside Shopify and not from an external storage. Mandatory fields are:
- Name
- Image URL
- Ingredients
- Instructions
Once all the necessary fields are filled, click on Save Changes.
See the screenshot below.
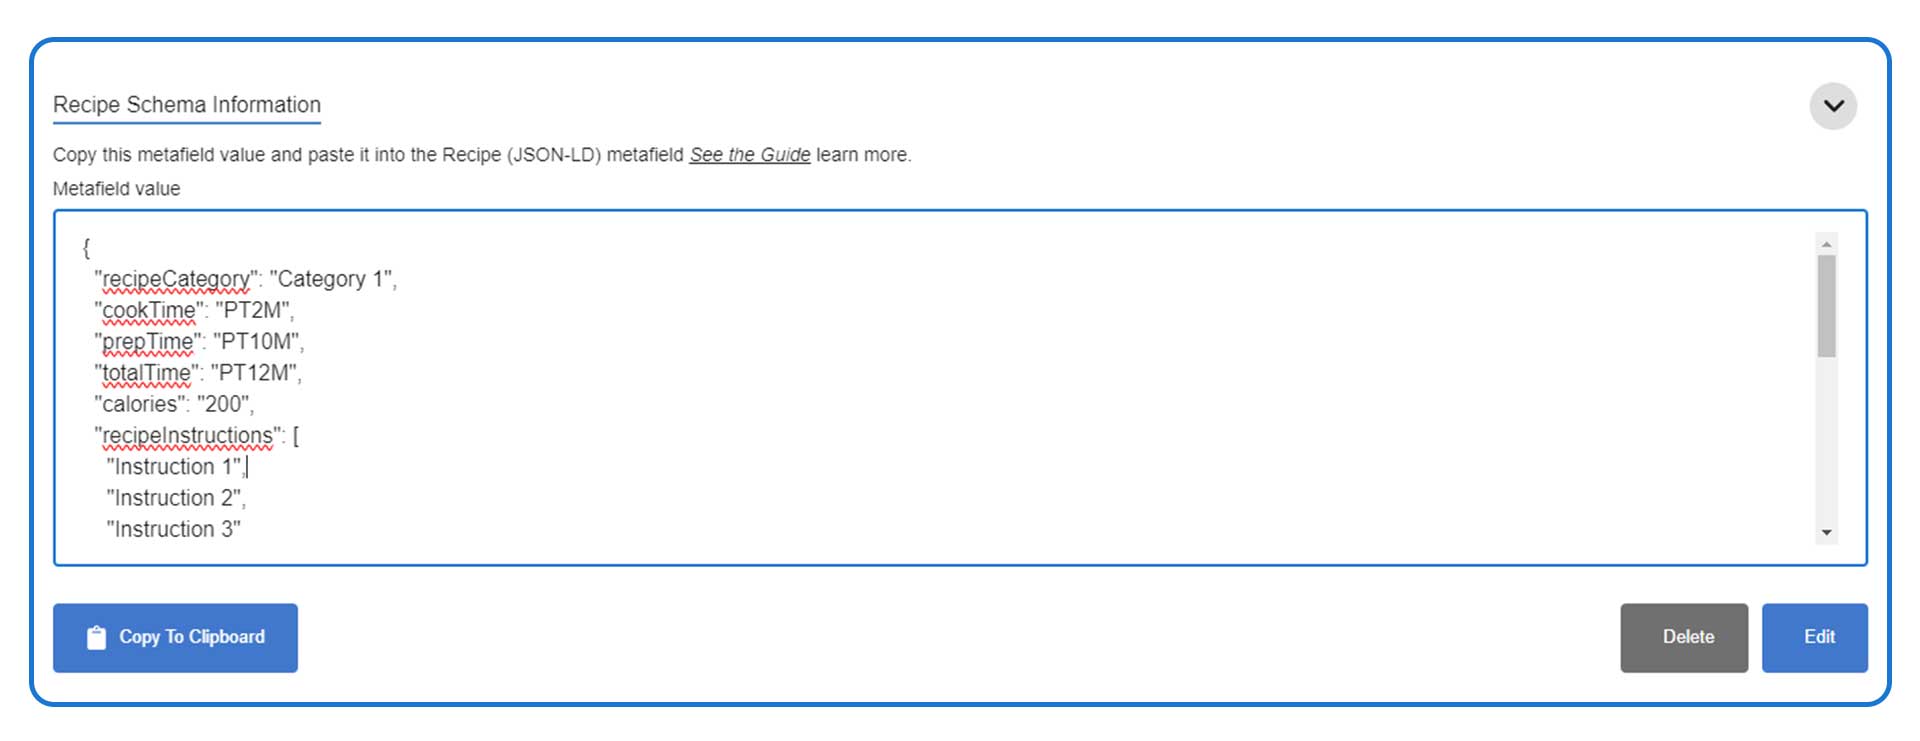
A new Metafield value will be created now. You need to copy the Metafield value. Click on Copy To Clipboard. If you need to edit before finally adding the Metafield to your page, click on Edit and modify the information you want to change.
See the screenshot below.
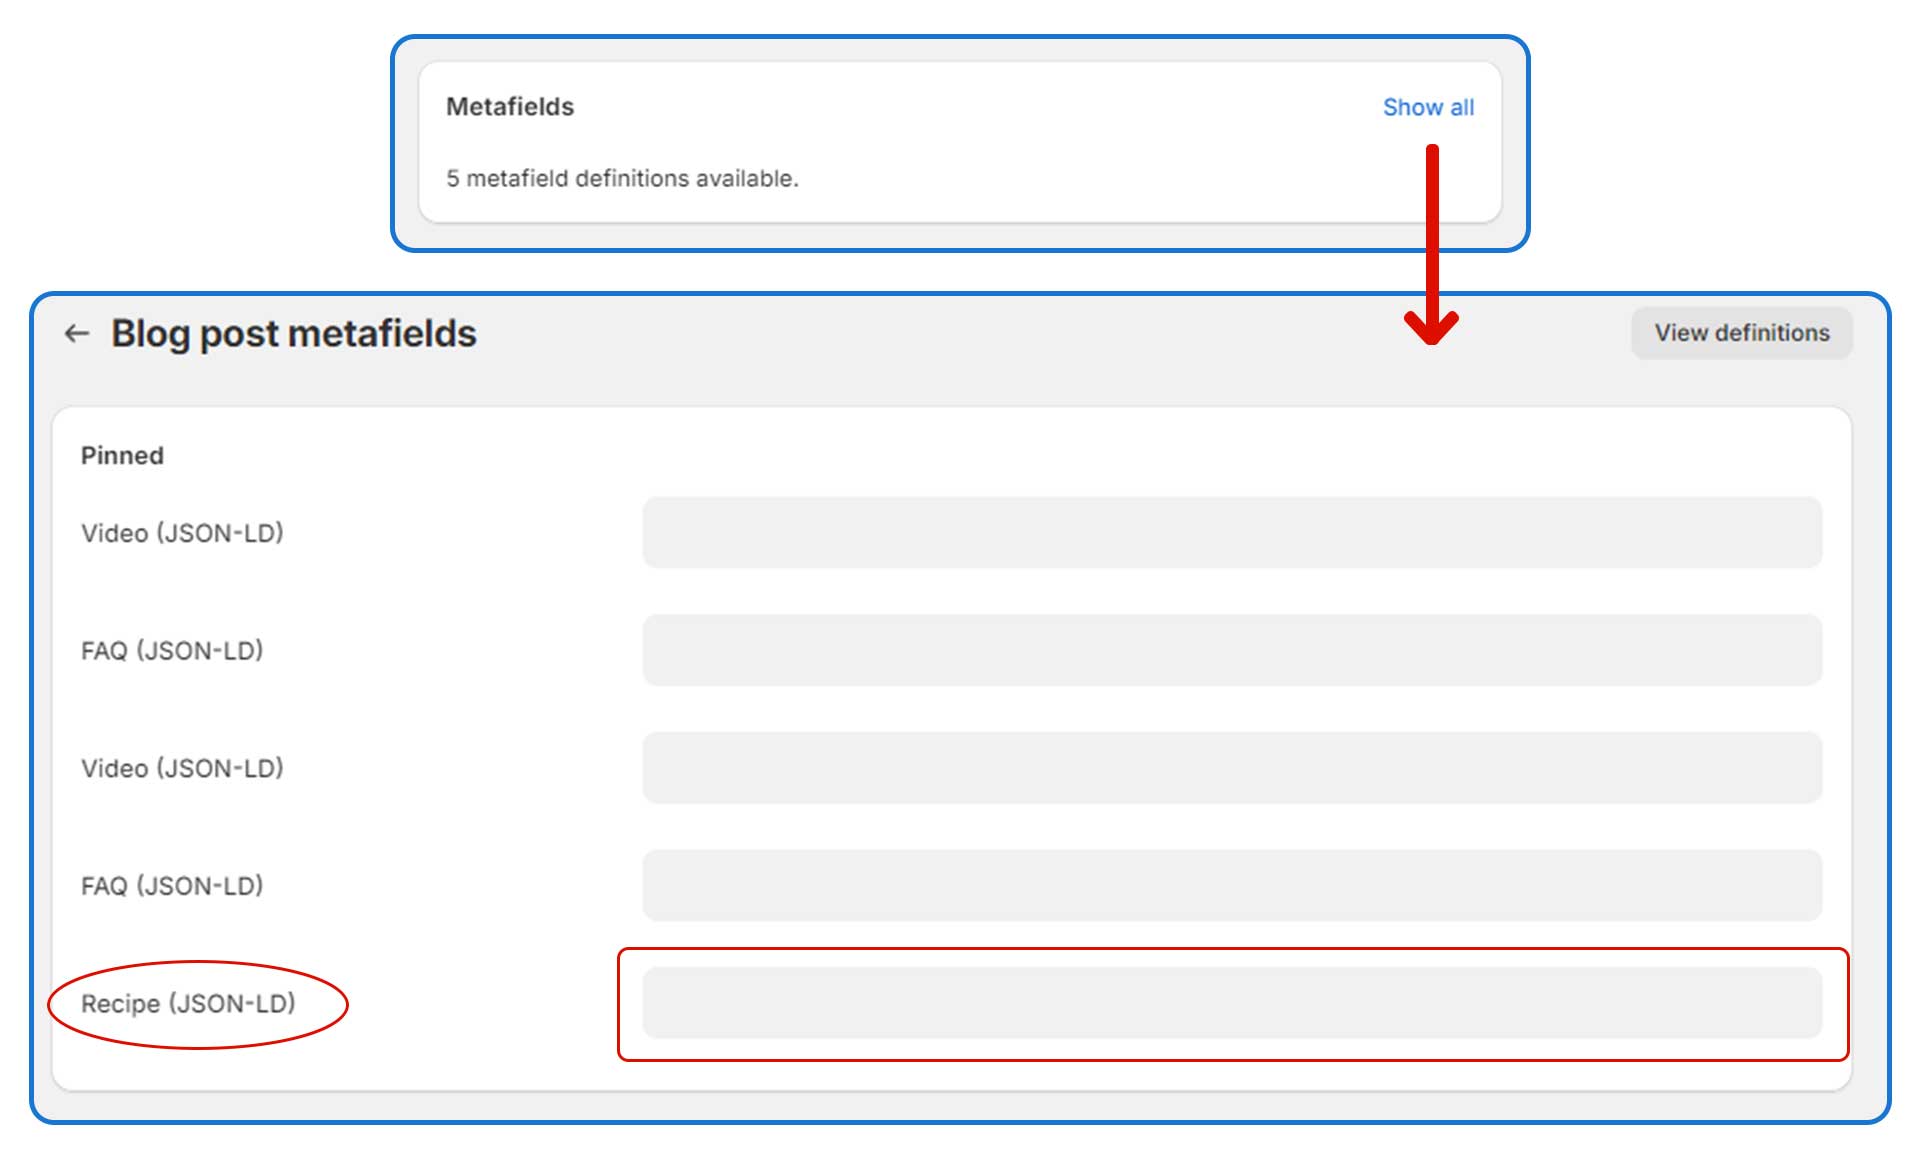
Now you need to go to the page where you want to add the schema for this specific recipe. For this example, we are going to add this to a blog post.
- From the Shopify admin panel go to the specific blog post to edit.
- Scroll to the bottom of the page and find the section that says Metafields.
- Click on Show all
- Paste the Metafield value that you copied earlier into the Recipe (JSON-LD) field.
Same steps are applicable for Product Pages, and Article Pages.
See the screenshot below.
Adding Video Data Schema
Video data schema has to be generated and put manually. For each Video, you have to create unique structured data and add them to the respective pages.
Video Data structured data can be added to four different types of pages.
- Blog Post
- Product Page
- Collection page
- Homepage
Click on the gear icon near Video Data Schema toggle icon or go to the Schema Settings page and find Video Data Schema Information from there.
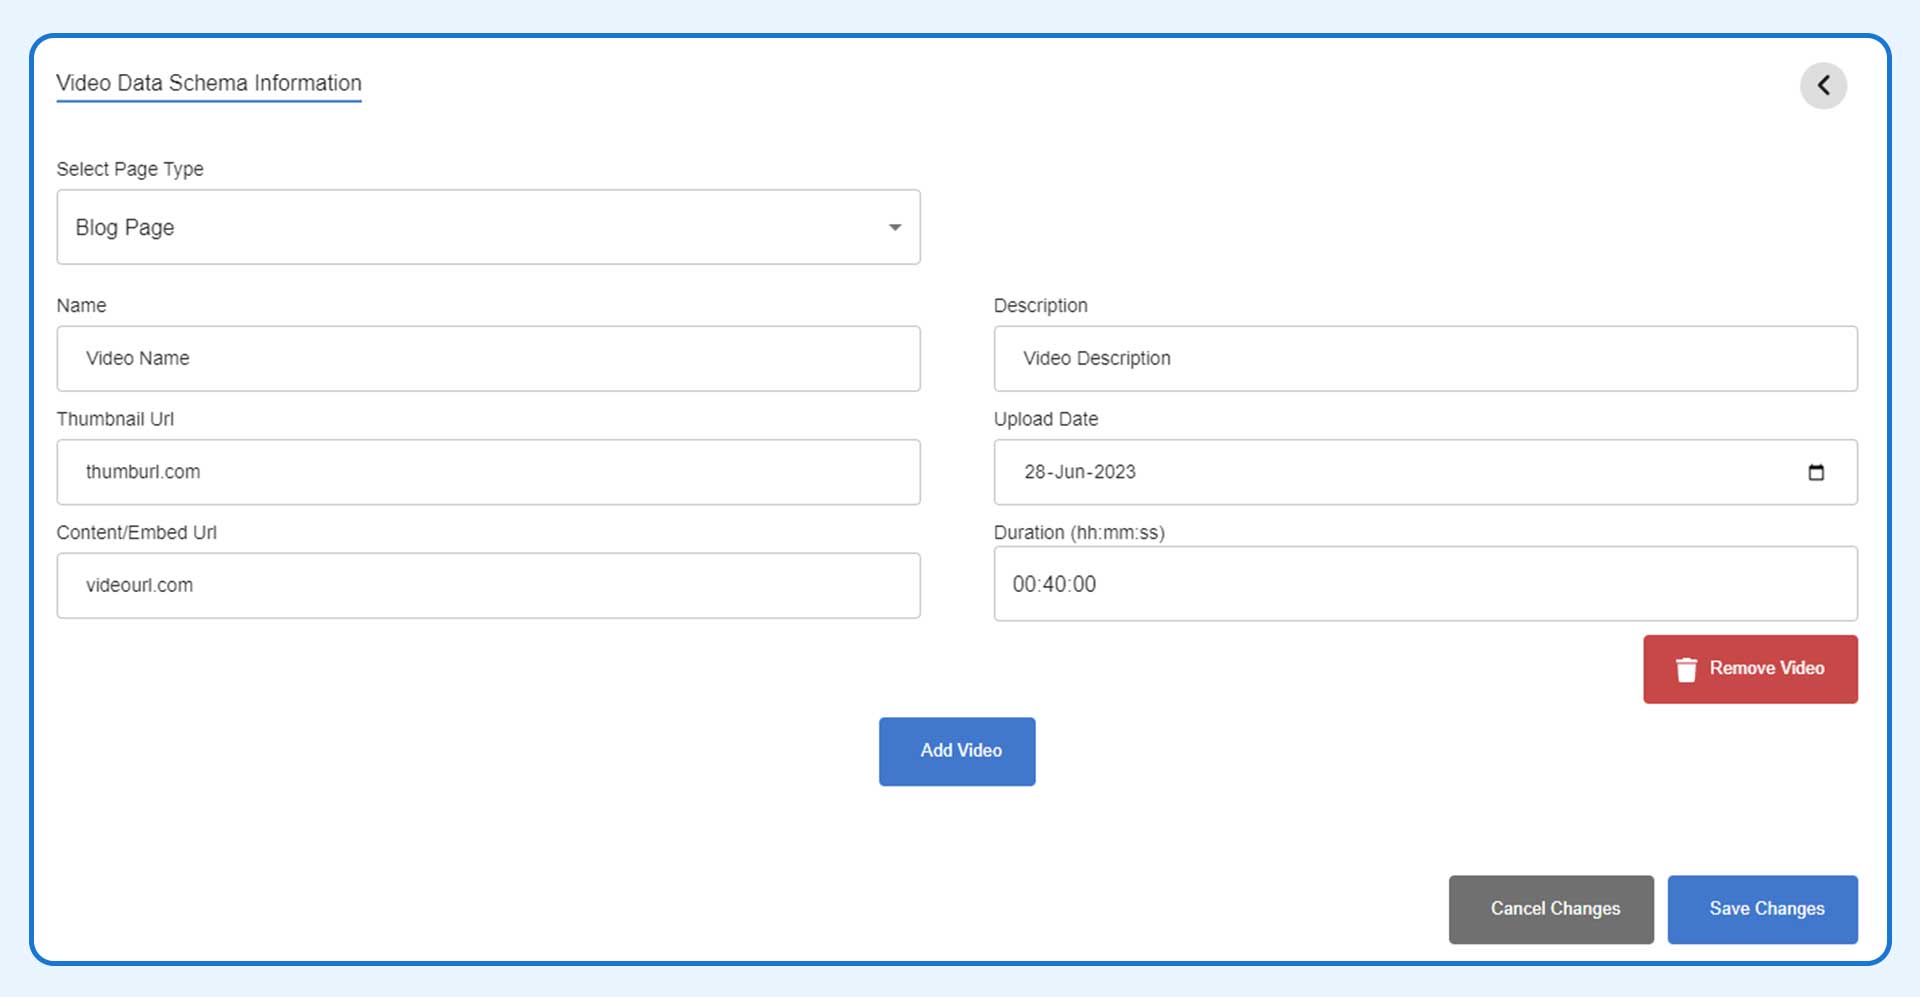
Now choose the type of page that has the video you are generating the structured data for. Fill out all the fields. In the Thumbnail URL field, find the image URL that’s inside Shopify and not from an external storage. Enter the video URL into the Content/Embed URL field. Mandatory fields are:
- Name
- Thumbnail URL
- Content/Embed URL
- Upload Date
Once all the necessary fields are filled, click on Save Changes.
If you have multiple videos in one page, click on Add Video button before clicking on Save Changes.
See the screenshot below.
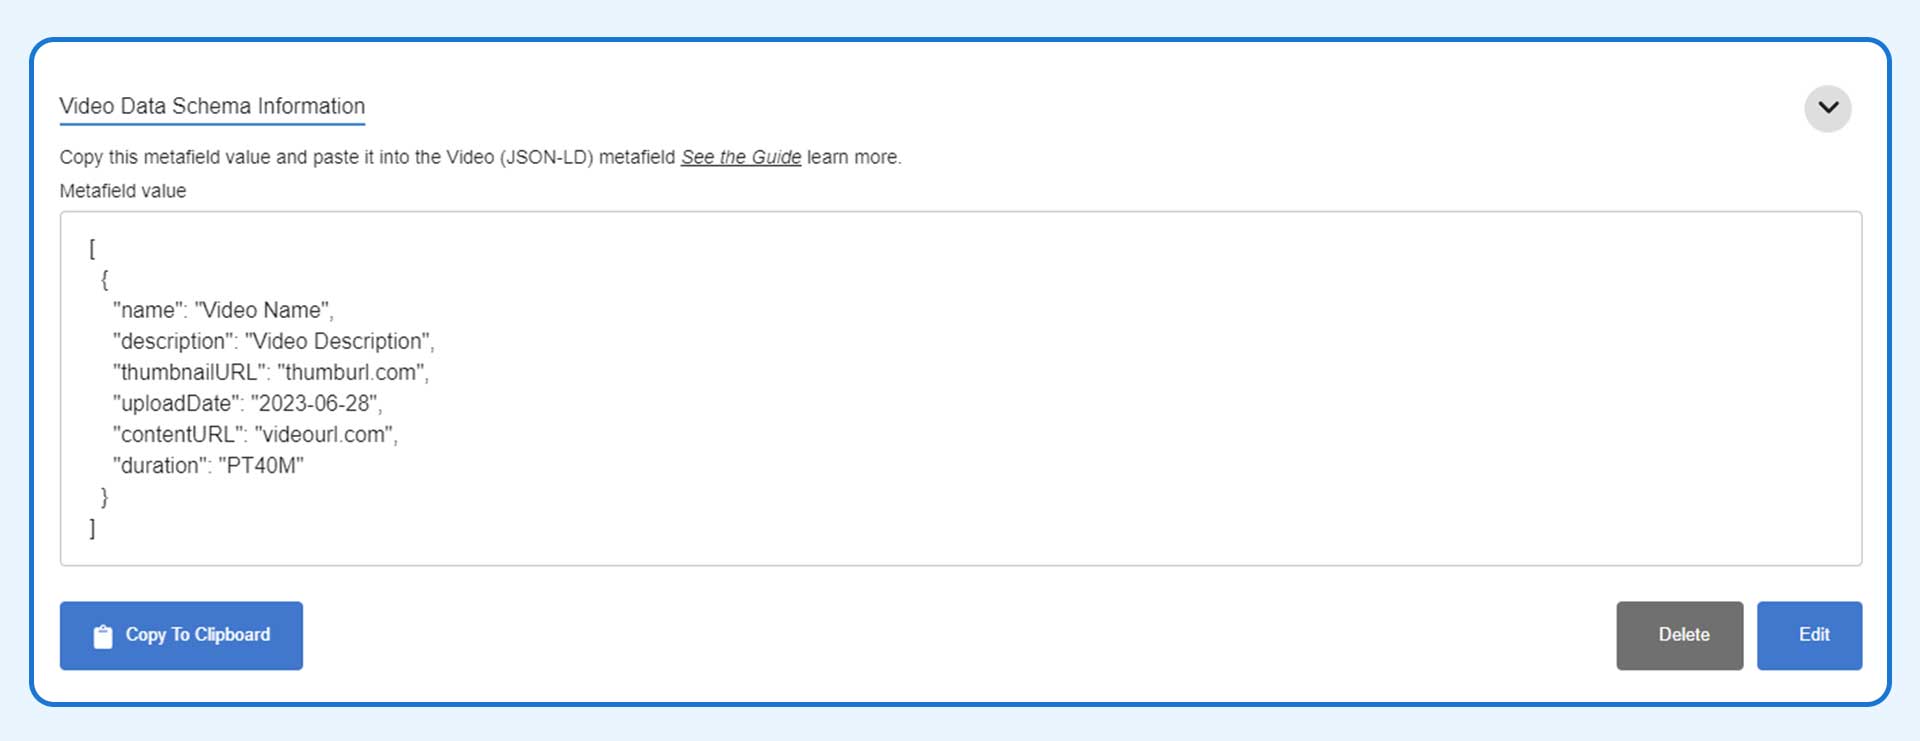
A new Metafield value will be created now. You need to copy the Metafield value. Click on Copy To Clipboard. If you need to edit before finally adding the Metafield to your page, click on Edit and modify the information you want to change.
See the screenshot below.
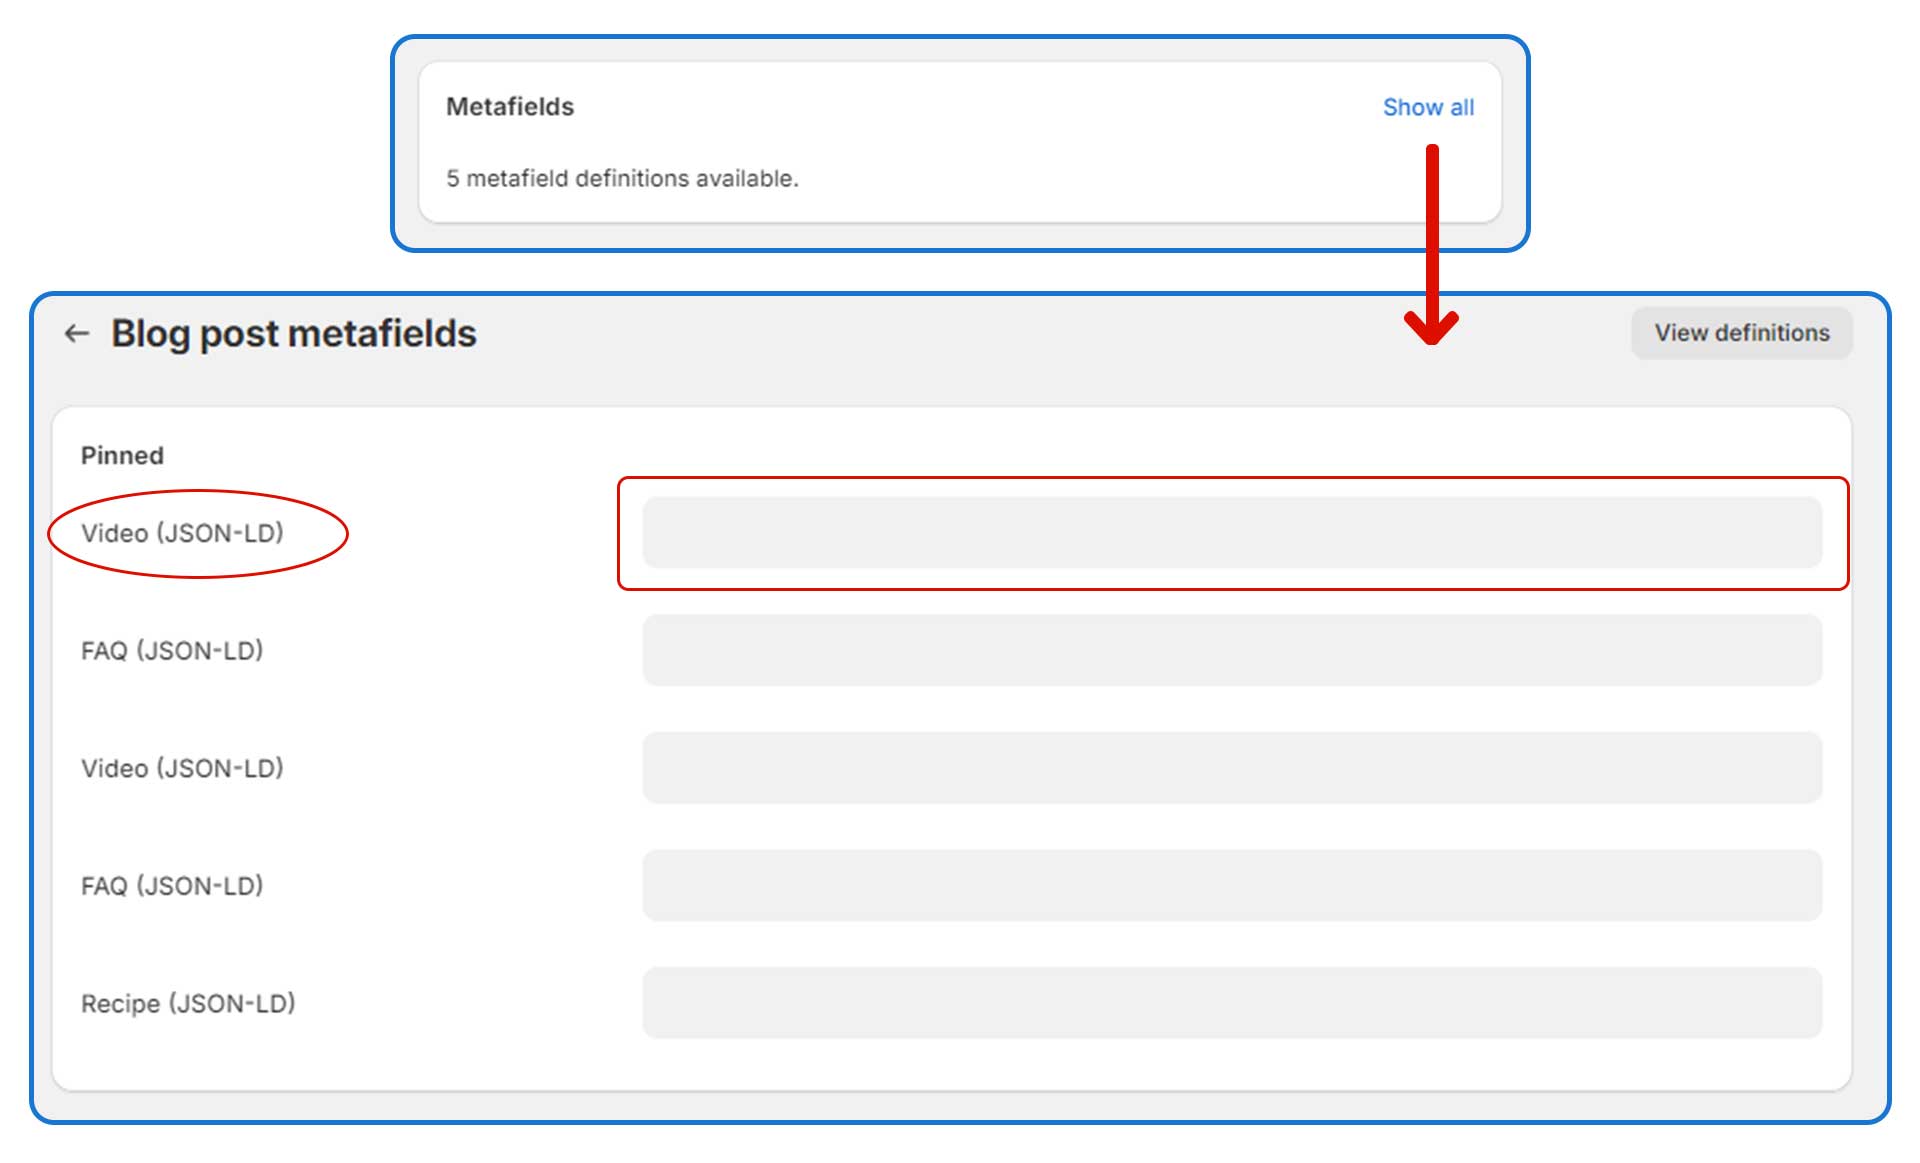
Now you need to go to the page where you want to add the schema for this specific video(s). For this example, we are going to add this to a blog post.
- From the Shopify admin panel go to the specific blog post to edit.
- Scroll to the bottom of the page and find the section that says Metafields.
- Click on Show all
- Paste the Metafield value that you copied earlier into the Video (JSON-LD) field.
Same steps are applicable for Product Pages and Collection Pages.
But for the Homepage, you don’t have to copy or paste the code anywhere. The code will be automatically added by the app after clicking on Save Changes.
See the screenshot below.
Adding FAQ Schema
FAQ schema has to be generated and put manually. For each list of FAQs, you have to create unique structured data and add them to the respective pages.
FAQ structured data can be added to four different types of pages.
- Blog Post
- Product Page
- Collection page
- Homepage
Click on the gear icon near FAQ Schema toggle icon or go to the Schema Settings page and find FAQ Schema Information from there.
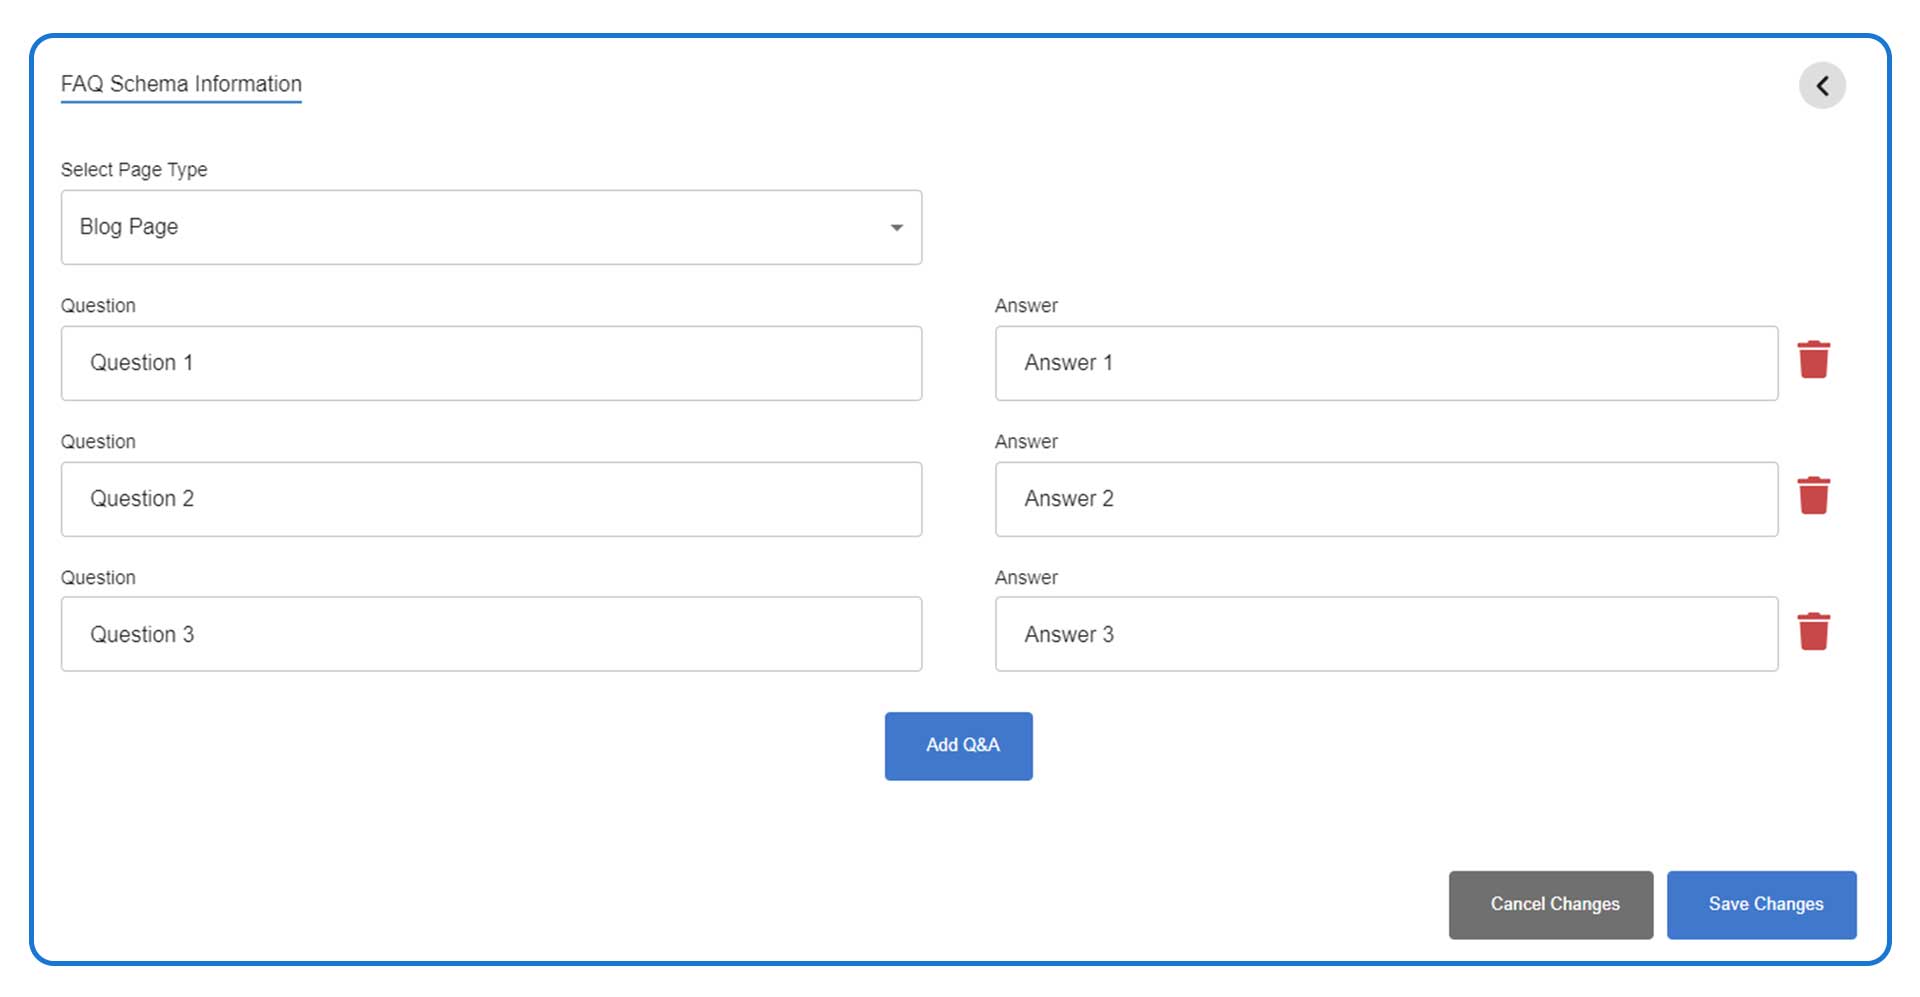
Now choose the type of page that has the FAQs you are generating the structured data for. You can add multiple questions and answers by clicking on Add Q&A.
Once all the questions and answers for a page are added, click on Save Changes.
See the screenshot below.
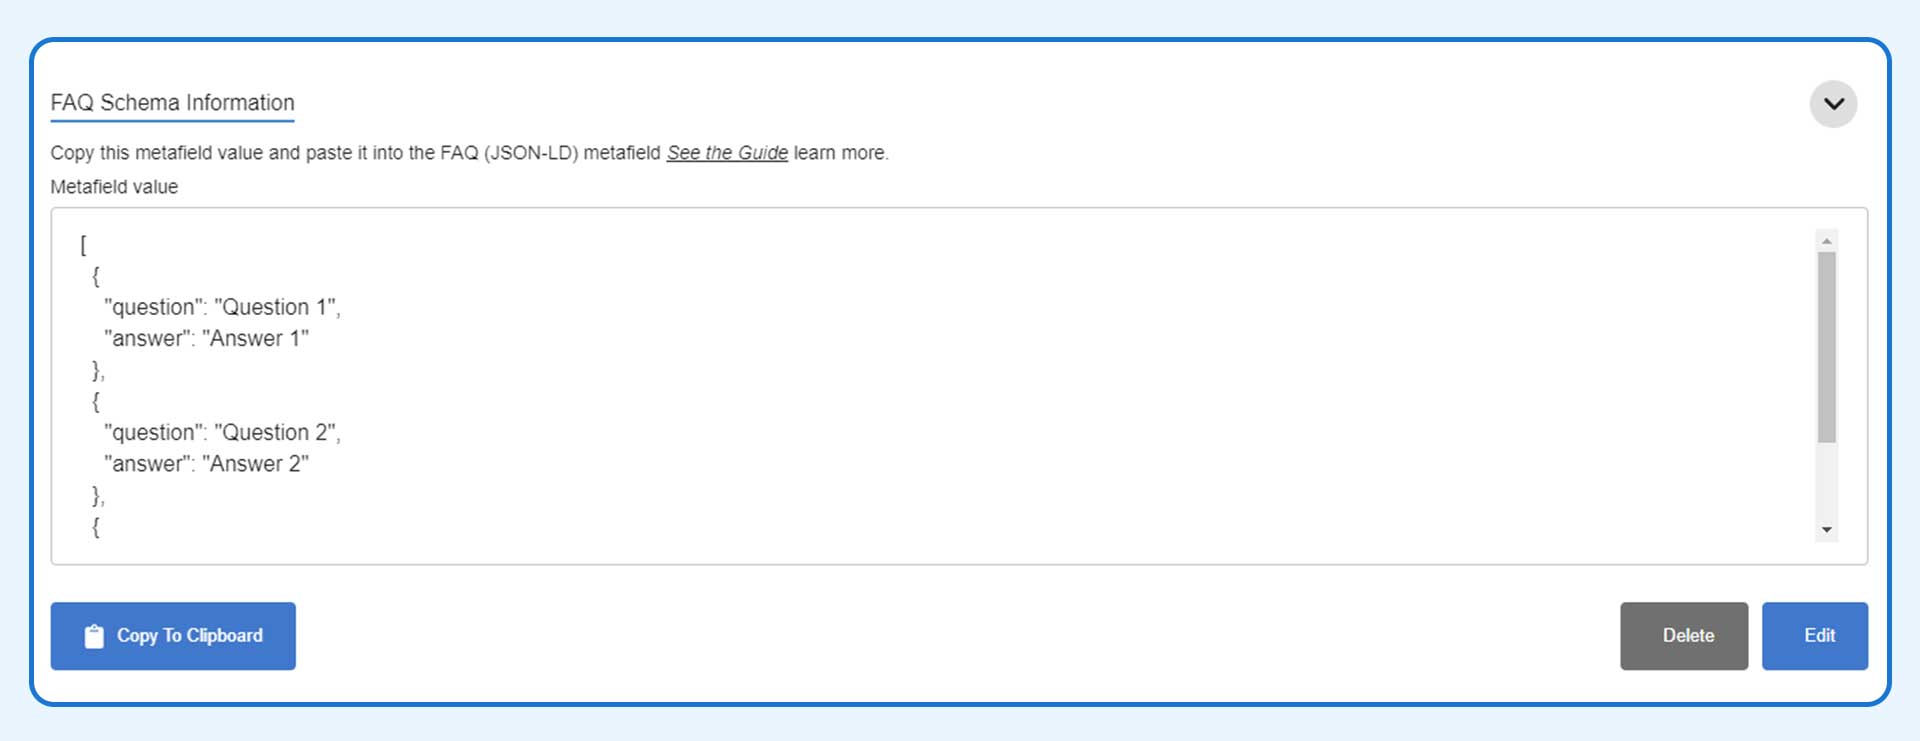
A new Metafield value will be created now. You need to copy the Metafield value. Click on Copy To Clipboard. If you need to edit before finally adding the Metafield to your page, click on Edit and modify the information you want to change.
See the screenshot below.
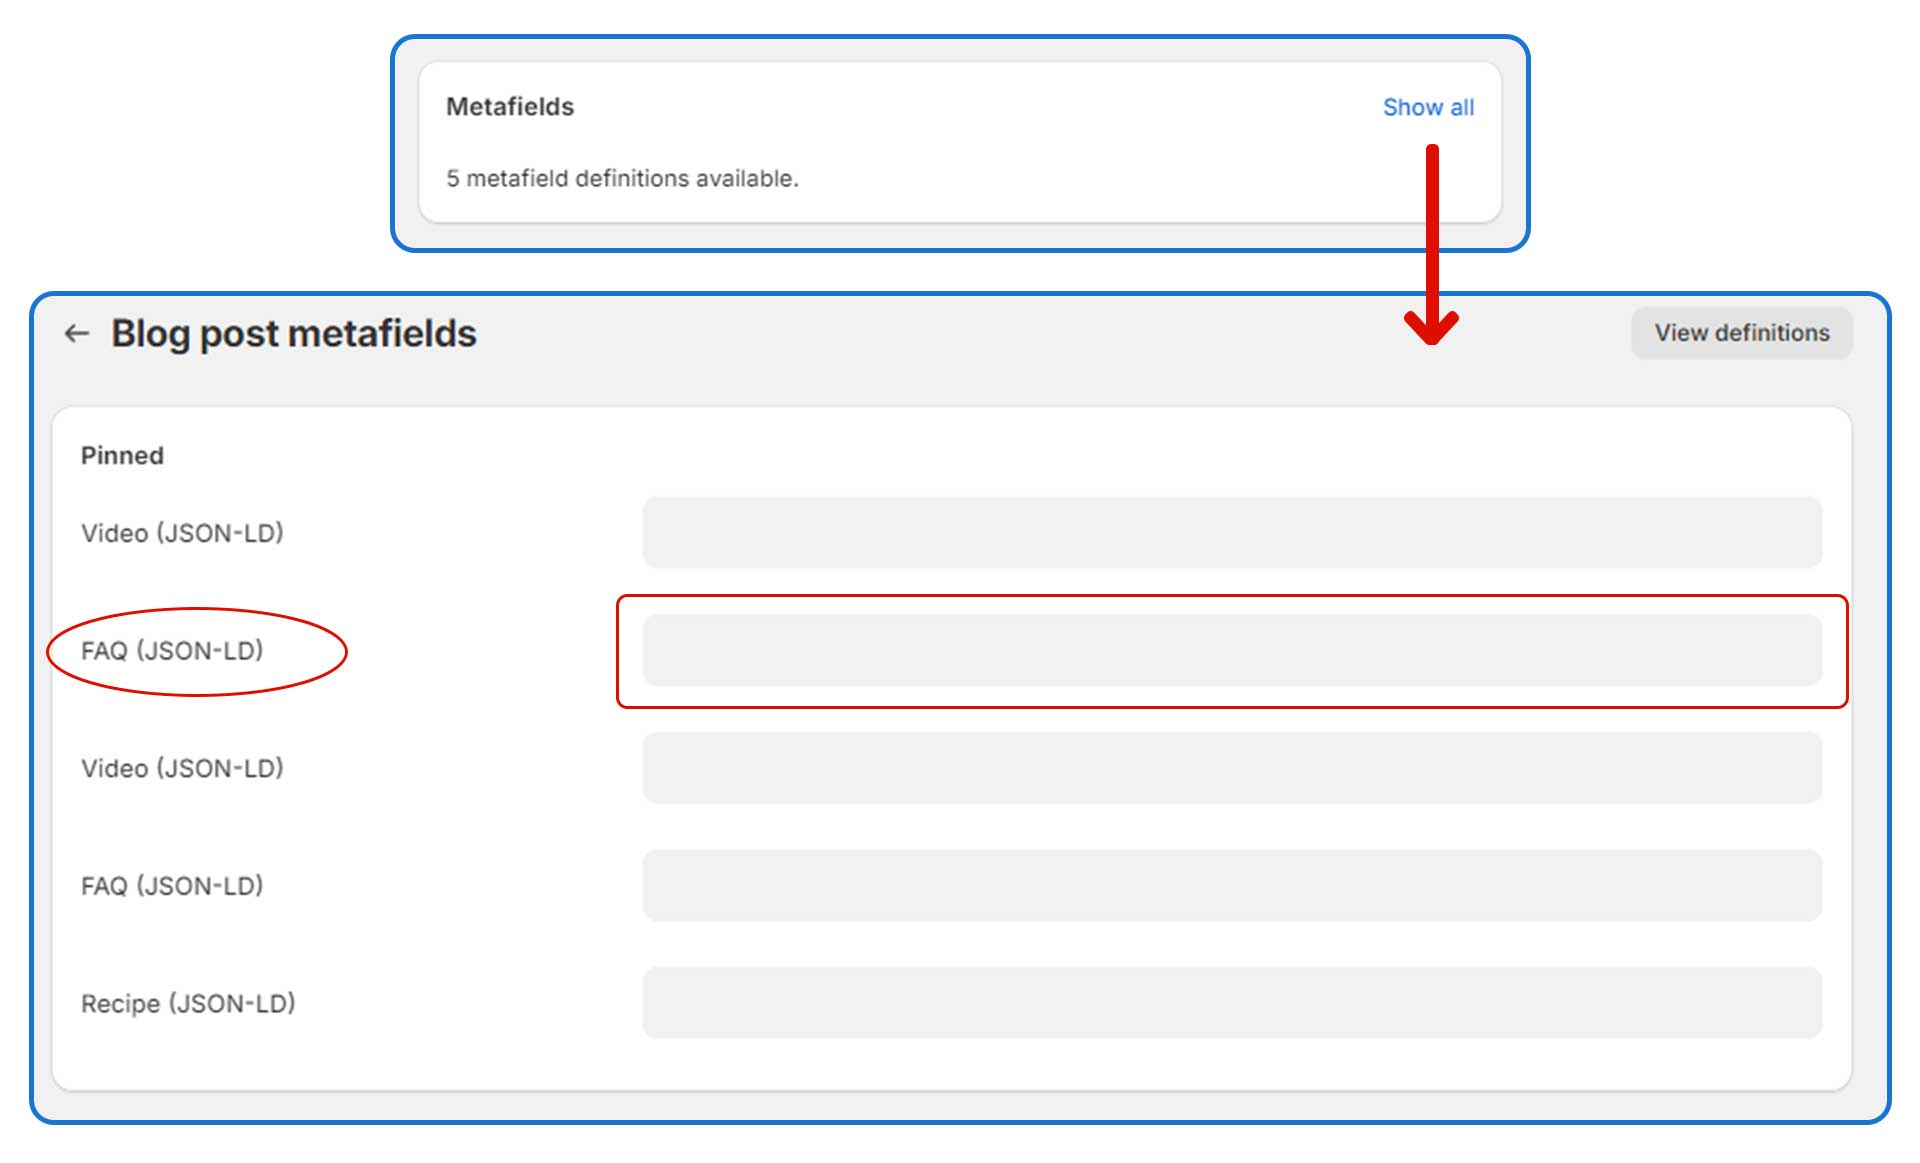
Now you need to go to the page where you want to add the schema for this specific list of FAQs. For this example, we are going to add this to a blog post.
- From the Shopify admin panel go to the specific blog post to edit.
- Scroll to the bottom of the page and find the section that says Metafields.
- Click on Show all
- Paste the Metafield value that you copied earlier into the FAQ (JSON-LD) field.
Same steps are applicable for Product Pages and Collection Pages.
But for the Homepage, you don’t have to copy or paste the code anywhere. The code will be automatically added by the app after clicking on Save Changes.
See the screenshot below.
How to test JSON-LD
Once you have set up and activated the app, now it’s time to check if the structured data is eligible for rich result.
Note: Installing the structured data doesn’t make your pages appear in the rich results on SERP instantly. It may take up to a few weeks for the pages to appear on the SERP with rich results. Having proper JSON Structured data is recommended from Google so that when it crawls and indexes your pages it can show your pages with all the rich information in proper format. The app’s duty is to generate proper structured data and deliver to Google. If Google doesn’t update the SERP, you can request reindexing the page from your Search Console account.
Step 1
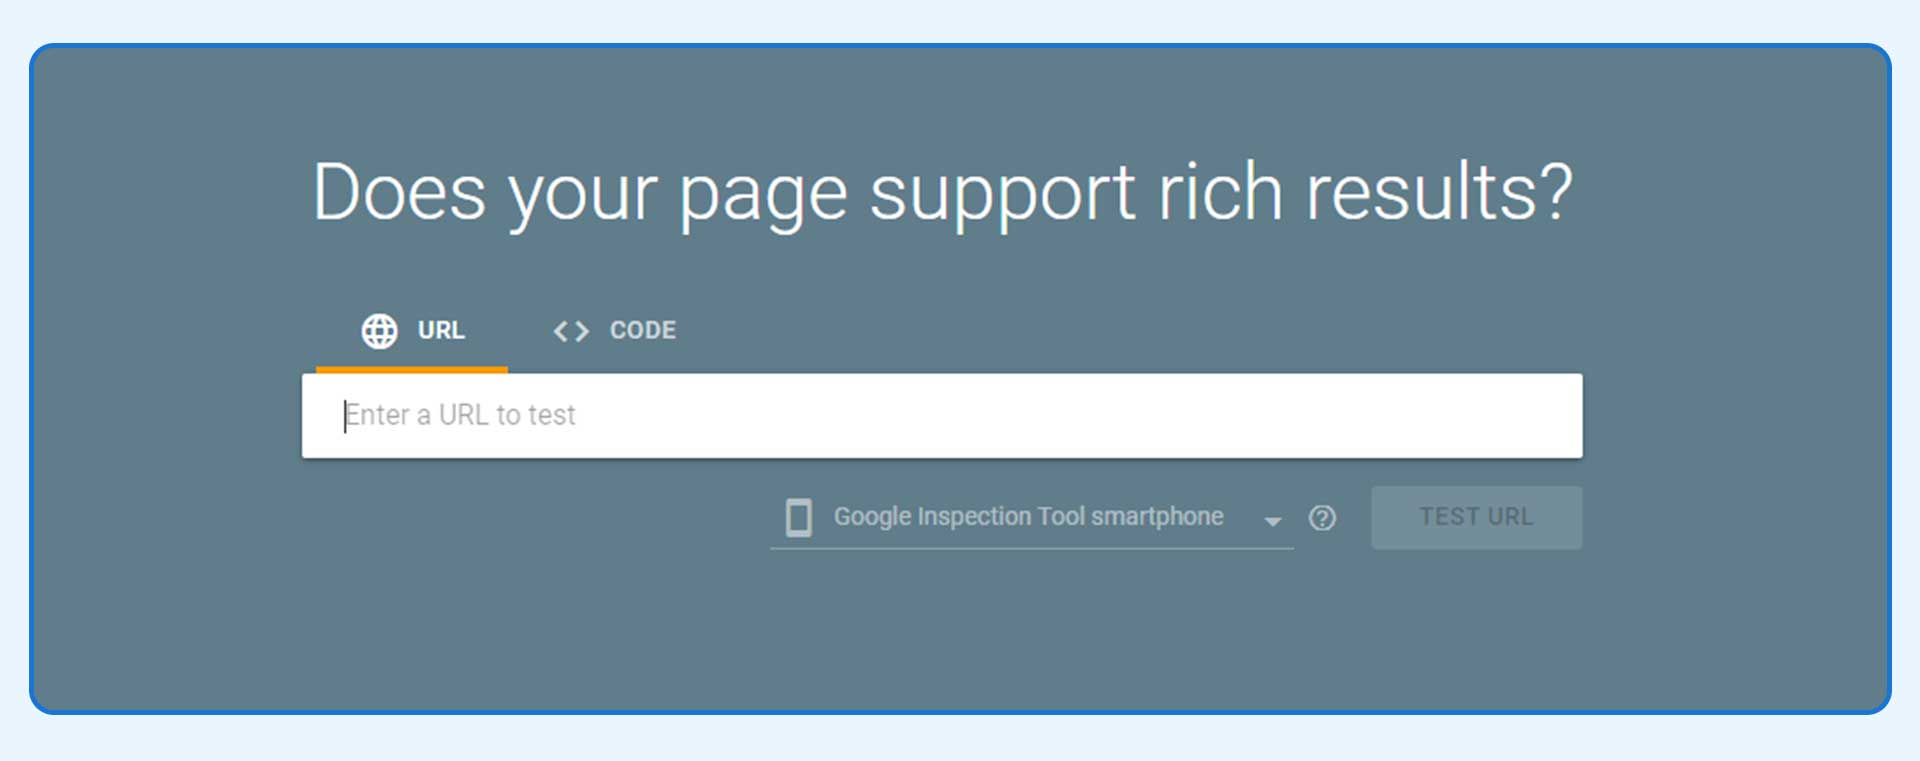
Go to: https://search.google.com/test/rich-results
Enter the URL that you want to test and click Test URL.
Step 2
Analyze the items detected by the tool.
You’ll see the valid items with the invalid items detected by the tool. When there’s no error or invalid detected it means the app is generating the structured data properly.
If you see an error that you don’t understand or need help with, please feel free to reach out to our support.


